

Leading edge rods will often break right at the ferrule because they create a weak point in the rod. The ferrule should project equally into (or onto) both rods being joined. If it is too short on one side it can cause premature breakage. Sometimes ferrules can come unglued and slip up inside the rod, leaving little or no ferrule sticking out to engage the other rod. If not discovered, this can cause you to break rods prematurely until you discover the problem. When you work on your kite or fold the wings for storage, make a habit of checking that the ferrules in your leading edge rods are still glued firmly in place.
To replace a wing spar, flex the upper and lower leading edge rods to verify which one needs
If replacing a lower leading edge, simply slide the new rod back in the same way the old one came out, reconnecting the elbow fitting and bridle as you go to match the other side of the kite exactly.
If replacing an upper leading edge, work the upper spar out of the nose and backwards towards the wingtip. Remove it through the sail cutout at the lower spreader.
BE CAREFUL: The broken rod could leave splinters if you let your hand slide along it.
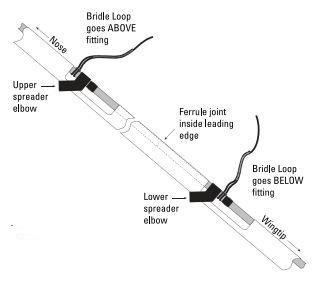
TIP: As the bridle and elbow fitting come off the upper leading edge rod, tie a slip knot in the upper bridle leg so you know which end of the bridle goes up as you’re installing the new rod. Replace the upper leading edge rod the same way it came out, through the lower spreader cutout. Be sure that the orientation of the elbow fitting and the bridle are exactly the same as you see on the other side of the kite. On most kites, the bridle goes around the leading edge rod above the elbow fitting (on the nose side of the fitting). Be sure to check the opposite side of the carefully to be sure you are re-assembling it symmetrically.
Our thanks to Prism Designs, Inc. for permission to use this content